
How to Make a Cosplay Shield
When looking for ways to add authenticity to your cosplay, adding the same detailed accessories as your character is a great option. Many characters popular in the cosplay universe use a shield as part of their costume. From shields with a specific emblem of the character to patterns meant to represent a family crest or a sworn allegiance in the universe of the character, a shield is more than just a way to avoid danger in a combat situation. Whether looking to make a shield worthy of a knight or one for a modern-day superhero, this is a great way to add authenticity to your look. Let’s take a closer look at how to make a cosplay shield to complete your look as your favorite character.
Step 1
You will need to gather the right materials to create a cosplay shield. The most important items you will need include a pattern to work with, tracing paper, cardboard, foam, a sharp blade to cut through foam, hot glue gun and glue sticks, craft board, and paint in the preferred colors. You will also need a cutting board or space to work while cutting, as well as a well-ventilated area when working with the paint.
On the matter of the foam, you should pay attention to how thick the foam is to ensure you get the right look and feel for the intended outcome. Foam comes in a range of thickness options to help you get the right one for your project.
Step 2
Once you have gathered all the supplies, the first thing in how to make a cosplay shield is to get the pattern right. When making a shield for a specific character, you may be able to find a pattern online or know someone in the cosplay community willing to share their pattern. You can also trace the shield out for yourself on tracing paper for a pattern, but make sure you use a ruler to line up the dimensions on all sides when tracing out the shield. It is best to make a mockup shield out of cardboard or cardstock before moving on to making one with foam to make sure you have the dimensions right. If the shield will have any embellishments such as an intricate tribal pattern or a crest, you should also use this time to create the pattern for those elements which you will later cut from foam and glue to the body of the shield. The good news is that as long as the shield is asymmetrical, as most shields tend to be, you will only need one pattern to create any edging you want to add to the face of the shield, and simply cut the pattern twice into the foam so it saves you a pattern.
If you are thinking of just carving in surface elements such as a crest, emblem, or edging, this is a bad idea. While you can cut into a foam surface, it would create essentially holes in your shield and make it more obvious that it’s foam rather than a real shield. When you glue on raised elements to the surface of the shield, it gives it a 3D look that is more accurate to real life and looks better overall.
Step 3
Once you have your pattern and any elements for the shield surface figured out, you can start marking your foam. To do this, simply trace the outline of the pattern on your foam. You can also do the same with any foam pieces or edging you intend to glue to the surface of the shield.
Step 4
The next step in how to make a cosplay shield is to cut out your foam elements. Make sure you use a sharp blade capable of cutting through the thickness of your foam and a cutting board underneath the foam. Trace along the marked outline with enough force to cut the foam. This is also when you will cut the edging or other foam pieces for the surface.
Step 5
Once you are done cutting the foam, the next step will depend on the type of shield you are making. If all the pieces of the shield, including the shield and any raised surface prices, will all be the same color, then you are free to move on to gluing the surface pieces to the surface and making the handle. If the raised surface pieces or edging will be a different color than the shield itself, then you need to take this time to paint the individual pieces or edging in the color chosen for your details. If the shield will have different colors, start by painting your edging or raised surface art, and then paint your shield in your selected colors. Make sure you paint on a surface you aren’t afraid of ruining such as craft paper or a cardboard box. Allow the pieces to dry completely before gluing.
Step 6
If your raised surface pieces or edging will be the same color (or if you want just a shield without these 3D effects), then you do not need to paint in two steps. Your next step would be to glue the pieces to the surface and then paint. Using a hot glue gun, line up the pieces or edging where you want in on the surface of the shield and glue them in place. If you are painting it all the same color, you can move on to the painting step now. There are plenty of paints on the market today which let you create a metal look thanks to their metallic sheen, but your shield can be any color you want to match the needs of the character.
Step 7
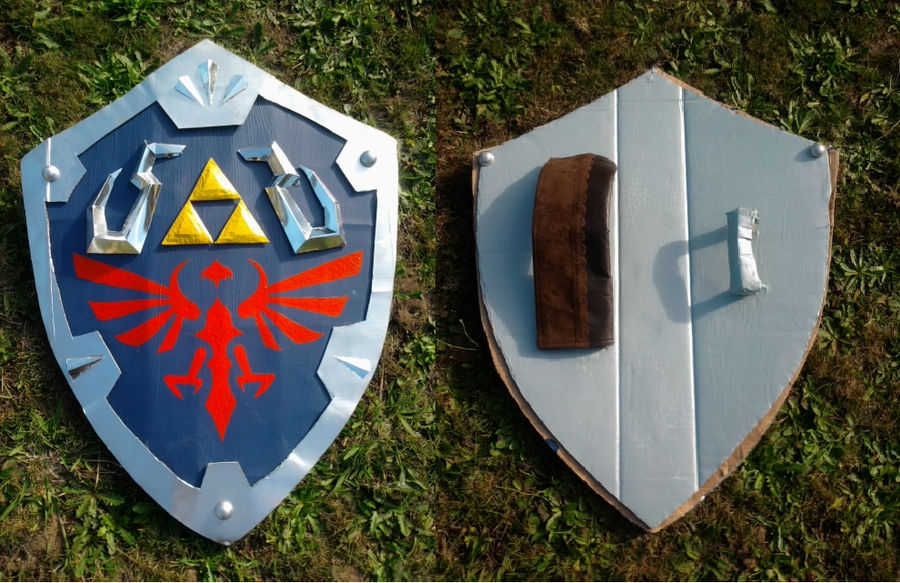
Once all the paint has dried and you have glued on any raised surface embellishments, you are ready to add a handle. The handle can be made from foam as well and should be measured and even in length as two strips. Measure your forearm to determine the right length for these strips since they will wrap around your arm when you hold the shield. These strips need to be long enough for you to roll them and glue them to the back of the shield. You want two so you can slip your arm through the shield and have a secure hold. Roll the strips into a circle and glue them to the back of the shield in a position that will be comfortable for you when wearing the shield. With a little careful measuring, cutting, painting, and gluing, you have just completed your cosplay shield for your character!
Posted in DIY, DIY Cosplay
Leave a Reply