
DIY Halloween Costumes and Decorations
Take your Halloween costumes and outdoor decor to the next level with foam! Since foam is so flexible and versatile, it can be cut, molded, and glued to enhance the textures and details of costumes or make your own decorations from scratch.
How to Create Halloween Costumes with Foam:
Step 1 — Planning: To construct your costume accurately, find a reference photo that will help you plan your character or concept. Take your measurements for the pieces of the costume you’ll be creating with foam, and remember that certain animated figures may be difficult to replicate with exact accuracy. Drawing a draft will help you gather the proper materials and maintain a constant reference point throughout the making process.
Depending on the costume, you may benefit from selecting foam with a pattern. Find 2D or 3D pattern foam sheets to help bring your costume to life. Make your own if you can’t find the color or pattern that suits your costume! Since foam is so easy to work with, you can use your own body to create your desired design and select a foam that will satisfy your costume vision. The unique shapes, colors, and details of certain types of foam can take your costume to the next level with very little work.
Step 2 — Pick Your Foam: One of the most common types of foam to use for costumes is ethylene vinyl acetate or EVA because it is lightweight and strong. Frequently used for cosplay armor, this foam can be molded for intricate detail with light amounts of heat. Assemble EVA foam with hot glue, super glue, or other types of strong glue. The few supplies required for costume construction with foam make this a simple and highly customizable DIY. Depending on your project, other attachments like velcro or snaps may be suitable for your costume. EVA foam can typically be found in various sizes, colors, and densities.
Step 3 — Construction: Once you’ve planned your costume, picked a pattern (if desired), and acquired some foam, measure and outline the shapes you wish to cut out of your foam. With a sharp knife or razor, make a bevel cut (at a 45-degree angle) to carve your foam and smoothly sculpt the edges. After cutting the piece for your costume, use a box cutter or scraper to carve patterns and other specific details.
Choose an adhesive like hot glue or gorilla glue and test it on your foam scraps to ensure it sticks. Stack or assemble your foam pieces following the glue instructions and allowing ample drying time.
Step 4 — Heating: Whether you’re designing a creepy goblin or a pretty princess, you can take this extra step to precisely match your Halloween costume to your vision. By shaping the foam pieces with heat, you will be able to mold the foam in ways that it can’t always be done with a knife. Some pieces of your costume (like a collar) may need to be molded before gluing and others can be molded after. Most costume foam can’t be bent or folded because of its thickness, but the heat gun can sculpt curves and shape to otherwise flat pieces. Smooth the texture and modify its shape by holding a heat gun about six inches away from your costume and moving it along the shape of your pattern molding with your hands as needed. As it heats, the foam will mold and smooth, making the texture perfect for painting. If you notice bubbles or little droplets on the foam, this is a sign that you’re either holding the gun too close or applying too much heat. If you accidentally burn a hole through the foam, caulk can fix it. Once the foam is smooth, rub the area with sandpaper and prime it with ModPodge or another craft foam primer.
Step 5 — Paint and Finishing Touches: When the primer dries, your costume is ready to paint! The possibilities are endless with paint designs and colors that can complete your costume. Different paint finishes will produce different effects, so decide if you want a sleek, matte, or different type of finish. Use spray paint or large brushes to create a base layer and add intricate details with small paint brushes for maximum precision. After the paint dries, your costume is ready for its Halloween debut!
Pro Tips for Costuming With Foam:
1.) Use a sharp blade when cutting foam to avoid jagged edges
2.) If shaping your foam with heat, use a glue that is heat resistant so it won’t melt
3.) Glue BOTH pieces of foam that you are attaching for maximum hold
Creating Outdoor Decorations with Foam:
Trick-or-treaters will marvel at the tombstones, ghosts, and mysterious figures that occupy your yard and porch. In addition to costuming, foam is perfect for customizing outdoor Halloween decorations. Unlike EVA foam for building costumes, polystyrene is sturdy and frequently sold in various 3D shapes and sizes. Its accessibility, affordability, and ability to hold its structure make it the ideal foam for most DIY outdoor Halloween decorations. Make your house the spookiest on the block for years to come with these simple and durable DIY outdoor decorations.
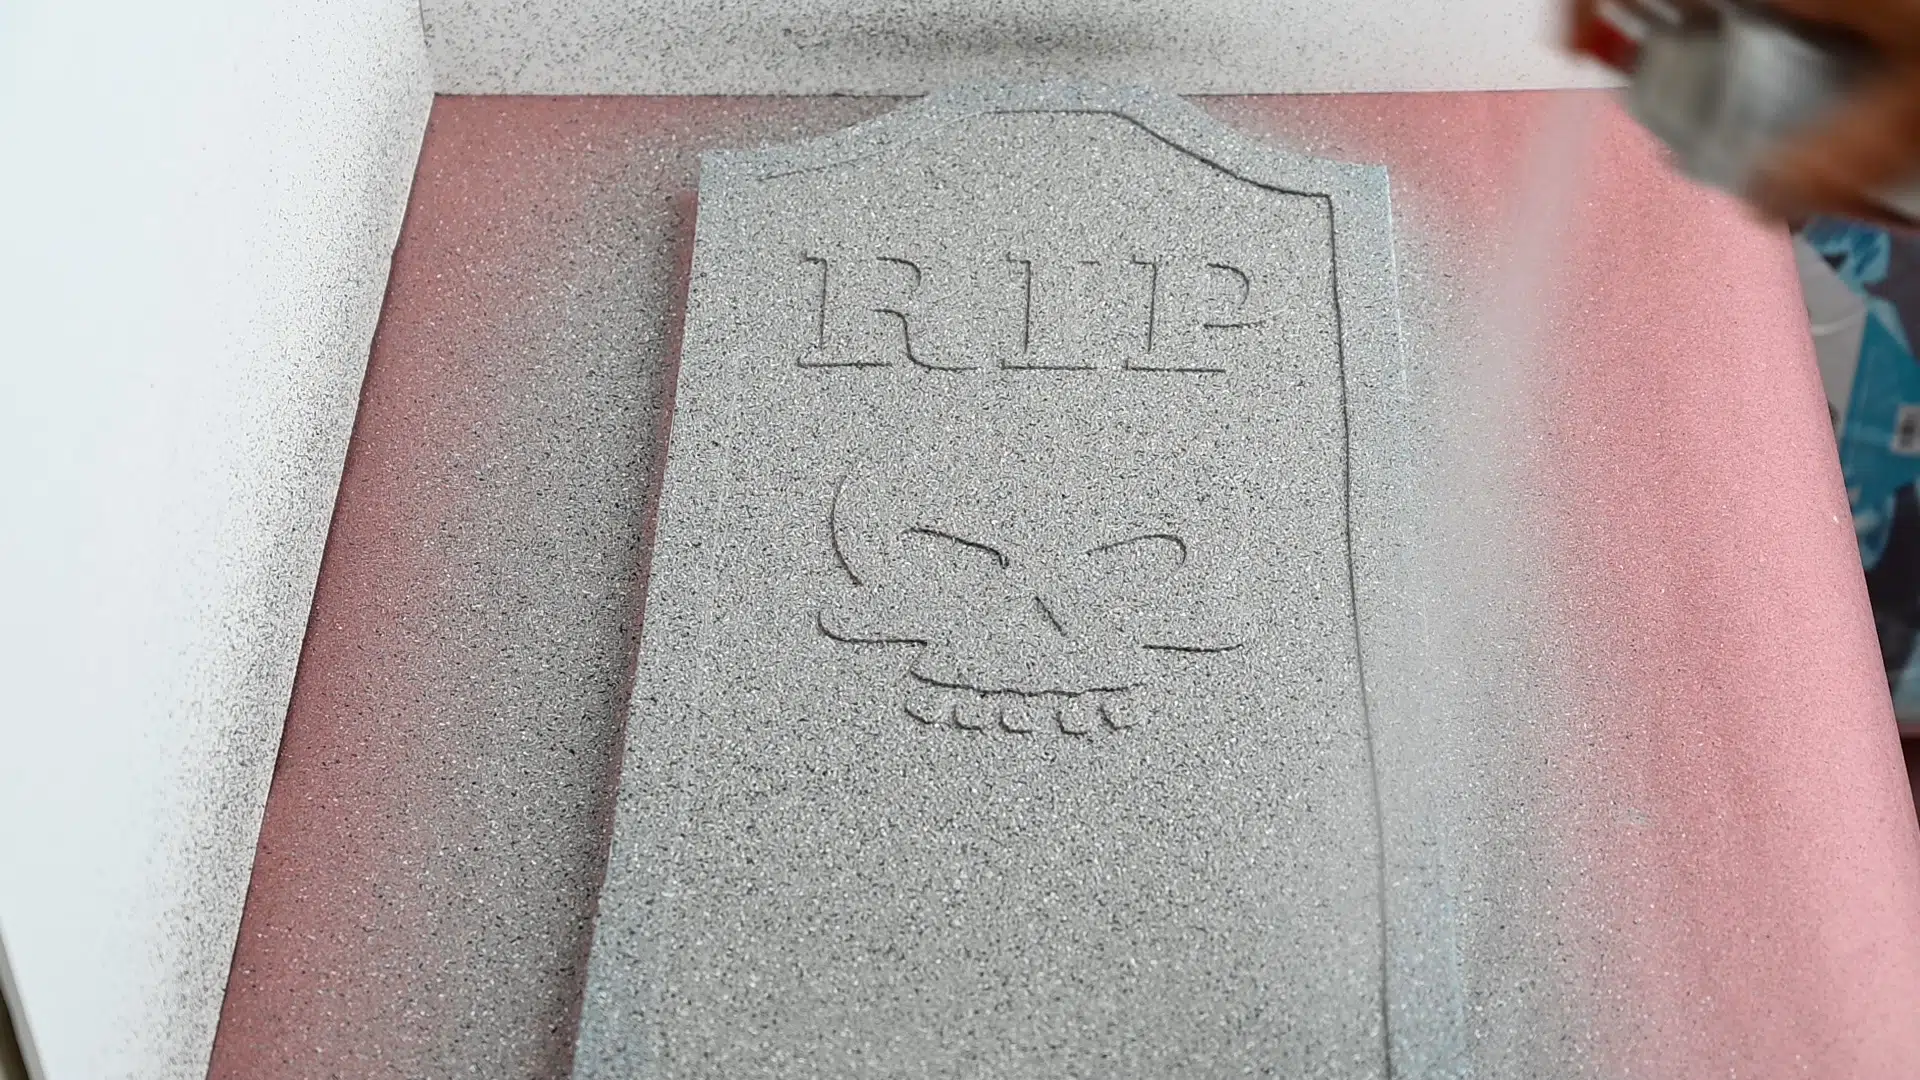
1.) Tombstones: Here lies one of the best Halloween DIYs! Transform your front yard into a terrifying graveyard full of realistic-looking tombstones. Decide how many tombstones you want to create and gather enough polystyrene sheets to trace them. Once they are outlined in the shapes and sizes you desire, cut them out with a box cutter or another sharp blade. For increased thickness, glue tombstones together with a strong adhesive. Different techniques will produce different texture effects on the headstone for a graveyard with variety. For a wood look, use a hot knife to break down the surface of the polystyrene and produce a grain effect. To create a marble effect, paint a base coat and then use a thin brush to paint the spidery veins of a marble texture. Textured spray paint can also be used for a stone effect. Print or write the epitaph on the front of the stone and place them in your yard. Use outdoor water-based paint to enhance the durability of the decoration.
2.) Ghosts: Spook trick-or-treaters with some creepy ghosts swaying in the wind. Customize your ghosts and make them cute or scary in just a few simple steps. Gather some white muslin fabric and cut it into large or small squares, depending on the size of your ghosts. Wrap the fabric around a polystyrene ball to create the ghost’s head and secure the ends with ribbon or string. Draw on some facial expressions with a sharpie, grab some fishing line, and hang them from your porch or trees for a haunted yard.
3.) Foam Skulls and Skeletons: Complete your graveyard with some foam skulls and skeletons scattered around your tombstones. Grab large foam balls for your skulls and polystyrene sheets for other body parts. For the skull, cut a straight line along one side of your ball so it can rest on a flat surface without rolling. Then, outline the skull’s shape and carve into the foam to create the features. The rest of the skeleton can be cut out of a foam board and assembled with glue or left dismembered. For the final step, paint your bones white and scatter them around your yard.
4.) Witch Legs: Trick-or-treaters will get a kick out of these fun witch legs! Stick them out of your doormat, in a bush, or hang them from a tree to make it look like a witch crashed her broom. All you’ll need is some foam tubes or pool noodles, kid’s leggings or tights, and a pair of shoes. Pull the tights over two foam tubes to create the illusion of legs, place or glue shoes at the feet, and stuff your witch legs somewhere visible. This DIY decoration is easy, fun, and perfect for Halloween.
Whether making costumes or outdoor decorations, save money and customize your Halloween experience with foam. The possibilities are endless, and the spooky results will make your home a neighborhood hit!
Leave a Reply