
Carve Beautiful, Organic Shapes Out Of Foam
Foam carving is a fun, creative way to create organic shapes out of foam. It is also a great way to add dimension to a project. Foam is a versatile and affordable material that’s accessible for new and veteran carvers alike. Foam carving is done with a variety of tools, including: knives, saws, sandpaper, and adhesives. When carving foam, it is important to use the proper tools and techniques. Incorrect or improper use of tools and techniques can damage the foam and make it difficult to carve. In this blog, we’ll go over a few tips, tricks, and must-haves for foam carving to help you be prepared for your next big project.
What Are Organic Shapes?
If you’ve been looking to carve foam materials to appear organic, it is best to start at square one. In art, organic shapes have curves and flows that look entirely natural. These shapes tend to be asymmetrical, irregular, and are commonly associated with animals or plants. You’re looking to capture something that isn’t artificial but is found in nature. Think of the curve of a river, the leaves of a tree, or the way raindrops fall on a window, drip down, and combine to make gooey oval-like shapes. If it’s something you’ve seen in nature, it’s probably an organic shape. These are often used in art to connect it to the natural world.
Tools for Creating Foam Shapes
Before you start carving some beautiful organic shapes, you’ll need the right tools. Two of the most important are saws and adhesives. When choosing a saw for your organic work, many veteran carvers opt for short handsaws. These are versatile carving tools that allow for easier cutting of curves, make more detailed cuts, and can carve intricate designs. Many cutting tools will do the trick, but always remember to sharpen a blade to avoid any accidents that could befall you or your projects. When using adhesives, contact adhesive works, but specially designed foam board adhesive works better for more rounded shapes, like organic. Adhere to the time and pressure requirements as listed on your chosen adhesive. Keep in mind that patience is key – it takes a considerable amount of time for the adhesive to fully adhere two surfaces together, and you don’t want your project to fall apart in the middle of sculpting it. Note that some adhesives can melt polystyrene, so make sure your adhesive is safe for the foam you are using.
There are some other tools that you might find useful when carving. Painting tape and wooden skewers will keep things in place and help prevent your sculpture from falling over. Different levels of sandpaper grit will achieve different levels of smoothness, so account for the type of texture you want and choose your grit accordingly. Power tools are effective to cut large amounts of foam quickly, but they don’t always fare well when it comes to detailing. Hand tools like scrapers, picks, rollers, or even chisels can also work to help make foam sculptures look more organic..
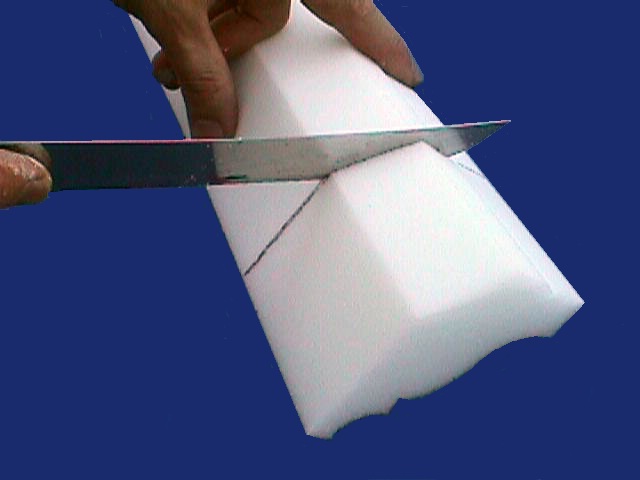
Ways to Carve Foam Safely
Foam can sometimes be messy, and will sometimes get everywhere in the room you choose to carve it in. Note that some foams are considered toxic materials should they be released into the environment or ingested through the air as it is being carved. Contact your local sustainability group to find the best products and practices to reduce potential harm to yourself and others around you. We recommend wearing a respirator, goggles, and industrial strength clothing, like a jumpsuit. These will help keep foam particles out of your face, lungs, and off your clothes. If you plan on using power tools, remember to wear some level of hearing protection, as well.
One more safety tip: never burn your foam. Even if you think it will add a cool effect to your sculpture, it’s not worth risking your health over. Carve with caution in mind.
Unlike wood, most types of foam don’t necessarily have a grain that runs in a certain direction. This means you can bend or turn it in several directions without worrying about cutting difficulty. This helps you when creating organic shapes. This allows you to make a curvature from almost any direction. As with any act of cutting, be sure to always cut away from yourself to avoid causing yourself harm.
Keep in mind that cutting the polystyrene foam too fast by hand with power tools could ruin your sculpture. Make your cuts steady and smooth, breathe in and out slowly, and focus on the shape you want to make. For organic shapes, it may help to draw lines to show what you want to cut before you do. Having this stencil will help you to follow the image you had in your head. In addition to carving slowly, carve gently. Foam is relatively easier to cut than other solid carving materials, so don’t put too much pressure on your cut. You could risk damaging your sculpture. Take close measurements of your foam and cutting instruments to avoid cutting too shallow or too deep.
Every foam carving is unique and special; no two pieces of carved foam art will be the same. Some of the best tools you can bring with you when carving are patience, ingenuity, and creativity. If you know a carving professional, you can always ask for guidance. It also helps to keep a record of your practices; mark what was effective and what wasn’t. It’s sure to help with your future projects. Practice makes perfect, so don’t fret if your sculpture doesn’t turn out the exact way you planned it. Remember to try, try, and try again. If you still need help, you can always Contact Us!
Posted in DIY
Leave a Reply