
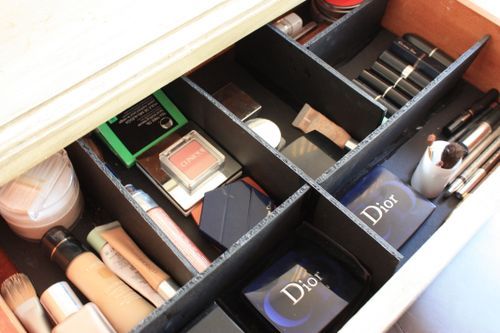
DIY Foam Makeup Drawer Dividers
Whether you’re an avid makeup fan, aspiring beauty guru, skincare beginner or expert, you no doubt have a place to store it all. If you’ve ever been in the process of cleaning up without proper makeup holders or organizing tools, you know what a hassle that can be as well as how quickly things can become cluttered over time.
Especially when makeup is put away in drawers. While having drawers for makeup storage leaves a surface clean of containers, the drawer itself often leaves much to be desired. Lipsticks and eyeliners roll about, brushes lay on unsanitary items, eyeshadow palettes slide around, and soon you’ve got a disorganized pile of makeup in your drawers just as bad as it was when it was on the vanity.
There are, of course, many pre-made ready-to-go options for organizing your makeup drawers. Items like cutlery trays, bamboo dividers, plastic, and so on. But these options aren’t as easily customized to the many different sized eyeshadow palettes, contour palettes, bronzers, blushes, and the other unique packaging your beauty items and skincare come with.
If you have ever wished that you could create makeup drawer dividers that were affordable, have compartments big enough for your makeup, and take up entire drawer spaces—read on! This is a great DIY foam project.
Supplies needed:
- Pencil
- Sheets of paper
- Blue tack or Ezy Tack
- A long ruler and tape measure
- Calculator
- Polyethylene foam sheets ¼” thick or polypropylene foam ¼” thick
- Sharp utility or craft knife
- Cutting mat or cutting surface
- Hot glue gun and glue gun sticks
- Sticky tape
- Scissors
- Eraser
Step 1: Measure the drawer
Using either your tape measure or long ruler, measure the interior of the drawer you will be creating makeup dividers for. Measure the length, width, and height (depth) of your drawer. These measurements determine the size of the frame you will need to fit into the drawer.
Step 2: Note the measurements
Make sure to write down these measurements on a sheet of paper and draw the layout of the box with the dividers you’d like to make. You’re creating a mockup of what you want for the result.
Step 3: Measure your makeup supplies
Measure any brushes, jars, containers, palettes, lipsticks, lip liners, eyeliners, etc. that will be going into the dividers. This will help you then determine the sizes for each compartment for the drawer so that you have room to neatly store everything in the drawer. Determine the sizes for each compartment according to your measurements and write all of it down.
Step 4: Create your paper template
Once you have calculated each compartment to fit within the drawer, draw and cut out each of them and label them with the measurements as well as what product it will be used for. For example, label one such as: “lipsticks,” or “foundation.” Now, using your blue tack of EZ tack, arrange the sections of the cutout paper in your drawer itself. Make sure that you have left a margin of ¼” inch between each compartment to accommodate the walls or thickness of the foam. By doing this beforehand, you can ensure that you’ve taken into account everything you’ve decided for the drawer and make sure the measurements fit.
Step 5: Make adjustments if necessary
If needed, adjust your measurements especially if you find that they don’t arrange in a manner suitable for your beauty items or make use of the space of the drawer. Make sure to check one more time that everything fits by re-doing step 4 with your blue tack to get an idea of how it will look and that the measurements fit.
Step 6: Draw the compartments into the box
On the sheet of paper you created, adjust any compartment changes to accommodate any layout changes you made in step 4 and 5, then draw the compartments into the box to get an idea of where everything should go. Make sure to label each section to mirror what they will be. Place the measurements for each compartment and then add 3/8ths of an inch to each compartment, but not the outer frame. The reason you will be adding 3/8ths is to create the tabs for compartments that will slide into the slots you will make to fit compartment walls together. You don’t need to do this to the frame, as the frame should be the exact dimensions of your drawer.
Step 7: Measure the foam strips
Place your foam on your cutting board or cutting surface. With as light of a hand as you can use, begin measuring each strip on the foam using the ruler. It is important here to double and triple check each measurement as the adage goes, “measure twice, cut once.” If you cut a piece too short, there’s no way to fix it, while cutting a piece too long can at least be addressed. Label each piece with its position in the drawer, such as right, left, back, front, top, vertical, and so on.
Step 8: Double-check your measurements
It doesn’t hurt to take a moment to check your measurements again here before cutting the boards. Cut straight toward yourself and stand or sit steady. When cutting the foam, it’s easier to score the top layer first and go over it again until you cut through to the bottom. This will help you have a nice clean crisp line without crumbling or foam breakage.
Step 9: Position the strips correctly
As a rule, keep the slots on the bottom edge of vertical strips, while all horizontal strips have slots at the top. That ensures that the horizontal pieces become sturdy and for the vertical pieces to lock into place. The cut-outs should be half as high as the height of the strips and as wide as the foam itself. You’ll need to do this to every strip excluding the frame.
Step 10: Cut the foam
After marking out where all slots and tabs will be, and that everything aligns correctly, begin cutting them out.
Step 11: Assembling the drawer
Now you may begin putting your pieces together in your drawer. If you’ve measured correctly it should be a perfect fit. Should you be happy with the result, go ahead and erase any pencil left on the drawer dividers while you begin warming up your hot glue gun. Once the glue gun is ready, put a touch of glue on the end of one piece and slot it onto the perpendicular piece and repeat as needed. When the framework is done, you can begin gluing the main dividers, then repeat the gluing process until your foam drawer dividers are built.
The final touches to these DIY foam makeup drawer dividers can be up to you! Acrylic paint, glitter glue, washi-tape, and anything you’d like could be used to decorate the foam should you choose. Go ahead and begin placing your makeup and beauty items into the drawer divider and voila! Enjoy your organized items that you can easily find immediately and never worry about clutter again!
Posted in DIY
Leave a Reply