
DIY Foam Birthday Decorations
Parents are often tasked with hosting the ultimate birthday party, including the essential milestone parties that happen throughout our lives. At Foam Factory, we understand that it can be a lot to think about and plan.
In your planning, though, you may decide that you want to do something wholly unique for your friend this year. One problem: where do you start? Luckily for you, we have some fantastic DIY foam birthday decoration ideas to help you make the next birthday celebration easier and more memorable than ever!
Giant Milestone Foam Birthday Numbers
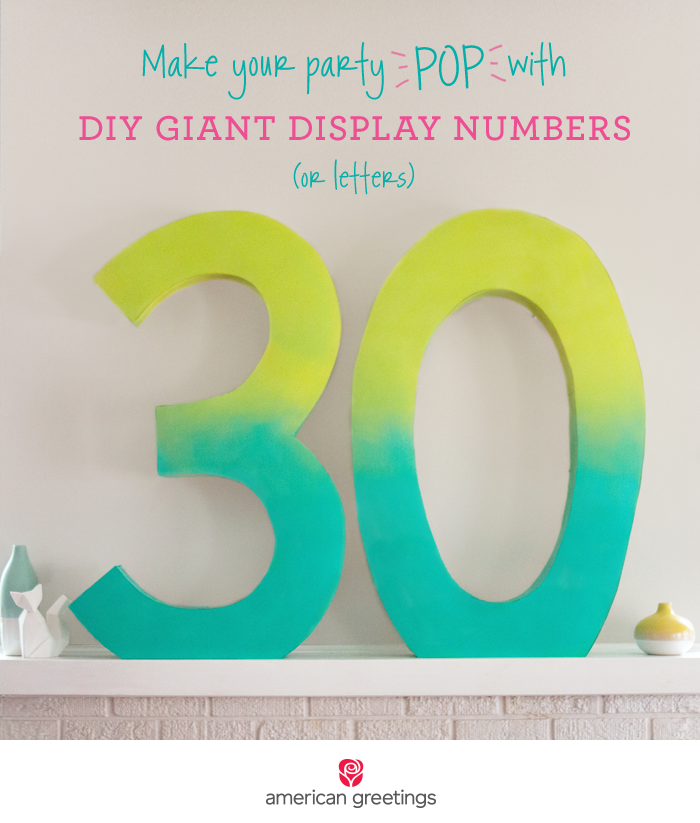
Whether it’s “terrific two”, “sweet sixteen”, or happy “60-years-young”, there’s a relatively easy way to make a gorgeous, giant mosaic number as a party decoration! Here’s how!
Supplies:
- Find a free PDF number file for printing in poster format.
- (QTY 6) 20″×30″ foam boards
- Ruler
- Pencil
- Exacto or craft knife
- Hot glue gun and glue sticks or foam adhesive
- Packing tape
- Clear tape
- Glue dots
- Approximately 35 7” and roughly 45 12” balloons in different colors of your choice.
- Optional: Hand air pump for more accessible balloon blowing.
Directions:
- To save on ink, before printing your number, adjust the file, scale to 500% and choose the ‘draft’ setting to save on ink.
- Print your numbers. They will print off in many sheets.
- Layout the sheets to create the number. There will be a small white border between the numbers. No need to worry about that. Make sure that the outer edge of the numbers lines up.
- Tape your sheets together, keeping the outer edges of the number even, then cut the numbers.
- Place foam boards together and trace numbers onto the foam boards. If you have a number such as 3, 5, 6, 8, or 9, remember to try and leave the bottom flat so that the numbers can stand on their own.
- Cut the foam numbers and attach the boards with packing tape
- With your remaining 20×30 boards, measure 6” strips and cut. Each panel should create roughly 3 strips.
- Cut the foam numbers and attach boards with packing tapeUsing your hot glue gun, begin to attach the 6” strips around the edges of your cut-out numbers. Straight edge numbers are easiest. For numbers with curved, lightly score the foam board an inch apart before gluing. Be careful not to press too hard during scoring, or you will cut through.With your remaining 20×30 boards, measure 6” strips and cut. Each panel creates roughly 3 strips.
- Once all strips have been attached, let the glue dry completely.
- Using your hand pump or manually, begin inflating your balloons. For the best look, try not to assemble more than a day in advance as the balloons may start to lose air and gaps may form.
- Once balloons are inflated, using your glue dots, place one glue dot and a balloon to the glue dot. Repeat this step, gently pushing balloons together to fill the inside of the numbers until the inside is completely filled with balloons. Once filled, place your big numbers wherever you like!
These enormous numbers make a beautiful addition to any birthday party and can be used as a delightful background for photos!
Pink Mouse Centerpiece Decoration
No matter how old you are, there’s a specific bit of magic in loving a particular mouse; you know the one. If your little one is a fan of this mouse, these foam centerpieces will be a hit.
Supplies:
- Polystyrene that is at least 8” thick. You will need enough to cut two 3-inch diameter circles and one 6-inch diameter circle. For multiples, consider more than one piece of foam.
- Black spray paint. Ensure the black spray paint is for craft foam. Otherwise, regular spray paint may melt Polystyrene!
- 1/8” and 1/4” wooden dowels, or dowels cut to the sizes you need.
- Stand and filler. Small planters are perfect and can fill the pots with sand. Top it off with pink paper or tinsel.
- Pink ribbon bow.
- Glue gun.
- Optional: if you want to carve the Polystyrene into balls, use a serrated or hot knife.
Directions:
- You will need to cut one 6” circle and two 3” circles. The 6” circle will be the head, and the two 3” circles will be the ears.
- Optional: If you wish to, feel free to cut the pieces a bit larger so that you can carve them into balls.
- In a well-ventilated area, spray paint all surfaces of your Polystyrene circles black. Allow them to thoroughly dry, roughly 24 hours.
- Attach the ¼” wooden dowel into the largest circle, then attach the foam into the vase/pot you choose as your display. You can use leftover scraps of foam pressed into the bottom to insert the dowel or use gravel/sand.
- Attach the 1/8” dowels to the smaller circles, then attach these to the head.
- Paint the wooden dowels black.
- Glue your pink bow(s) between the ears or smaller circles of your Polystyrene mouse.
- Fill your vase with a filler of your choice, and you’re done! It’s as easy as that. Place your pink mouse centerpiece decorations on tables or around the area and enjoy!
We hope we’ve been able to inspire you to start some DIY foam projects for birthday decorations! Foam Factory, Inc. has everything for your foam needs!
Leave a Reply