
DIY Foam Christmas Tree
Foam is great for creating a range of craft projects to great effect. Perfect for the holidays, foam can even be used to create a large foam tree! If you need a little help with this project, let us walk you through creating foam Christmas trees to make your holiday display truly memorable this year. This is an easy and fun project sure to bring some extra holiday cheer!
- Decide on the size
When creating foam Christmas trees, it is important to have more than just a general idea of the desired size. You will need specific measurements to ensure all the pieces work together to create the design so pick a height for the end result. If you are doing an indoor tree, try to stick to between 3 feet and 5 feet, unless the ceilings are higher and then you can do 6-7 feet. If this is part of an outdoor décor theme, you will have even more options for size. You can go small as you create tress to line a walkway or go grand with an 8-foot tall tree to stand at the center of the holiday display. When thinking about size, make sure you don’t go beyond what your base will be able to support. - Decide on a theme
Another important matter when creating your DIY foam project tree is to pick a theme. From green trees made to look like a whimsical Christmas scene to an all-white tree decked out with plenty of glitter for a winter wonderland scene, the theme will help you create the right end result for your vision. It will also make it easier to gather the right supplies for the project. - Gather supplies
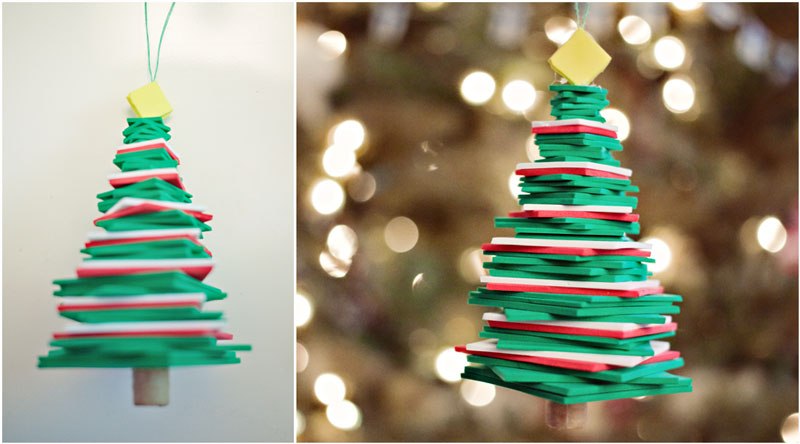
Once you know the size and the theme, you can gather the right supplies. You will need a few basics such as PVC piping to create the base and the stand, the desired foam, cutting blades, and measuring tape. You will also need tracing paper to practice the measurements and shape prior to cutting the foam. Based on your theme, you will need paint in green or white, as well as glitter if desired. You will also need an X-acto blade or other precision tools if you plan on carving details into the foam. - Start measurements
Once you have assembled all the supplies, you are ready to get started with your measurements. When creating a Christmas tree with foam, you will essentially cut out circles of foam to slide over a PVC pipe stand so keep in mind that the foam at the bottom will need to be larger in diameter with smaller diameters working up to the top of the tree. This is where tracing paper comes in handy. You can trace out the desired measurements on tracing paper and then line them up on top of each other to make sure they will look right when cutting from foam and put on the tree base. - Start cutting foam
The next step is to cut the foam once you are satisfied with the measurements. Using the tracing paper as your guide, mark the foam where you will cut it. Take this time to line up the foam pieces and correct any sizing issues with the diameters. - Measure and cut PVC
Once you have the foam cut, you can start working on the PVC stand. You will need to measure the pipe for height to reach the desired height of the finalized tree, as well as the diameter of the pipe because you will need to cut this exact measurement out in the center of the foam pieces to slide them over the pipe. - Make the stand
The stand can be made from connecting PVC piping in either a triangle shape or a rectangular. You can also drill holes in the PVC pipe the foam pieces will be on and then place it in a tree stand, but you will need to make sure the holes line up and offer ample support. The goal is to make a stand that will hold not just the center beam or pipe of the tree, but also the foam once it is painted and assembled. The good news is that foam is one of the lightest materials so it’s ideal for such a project, and the design of being bottom-heavy in the shape of a tree will also help to give the end result more stability. - Paint/glitter
Once you have the measurements and cutting done, you can start painting. If you are going to do any carving in the foam, such as carving the edges to look more like branches, do this prior to painting. When painting the foam, make sure you do so on a surface you are willing to mess up such as newspapers or crafting paper. If you are painting foam and then applying glitter, it is best to so in layers after the paint dries. If this will be an outdoor décor item, you may want to cover the foam in a layer of decoupage glue such as Mod Podge. - Allow foam drying time
Once you have applied the final coating of paint, glitter, and/or Mod Podge, you need to allow the pieces to dry before assembling them on the pipe stand. If you don’t allow them to dry, you will end up with a messy end result that doesn’t look quite as nice. This also gives you time to work on other elements of your décor in the space while it dries. - Assemble in place
Once the foam parts have dried completely, you can move the base to where you will display the finished tree, and start assembling. Starting with the widest part of the tree foam pieces, slide the foam over the pipe and continue placing the foam in an order that gets smaller as you reach the top of the tree. You can even add a foam star to the top of the tree or your favorite angel topper for a finished look.
Leave a Reply