
Celebrate Back-to-School Season with Easy Foam Craft Projects
It’s almost time for the kids to don their backpacks and return to school. Many parents have probably already heard about how excited their children are to see old friends and make new ones. Naturally, one of the most exciting parts of returning to school for your kids is all the new school supplies. Who can resist that new notebook and book bag smell?
Stores are undoubtedly bombarding us with new sales and deals for last-minute supplies. It can be tempting for a parent to purchase everything, but did you know you might be able to MAKE some of the cool school supplies your kid needs this year?
We have some fantastic back-to-school foam crafts that you might love to try. Check out how to make these adorable foam crafts below!
Make an Easy No Sew Pencil Case with Foam
For this easy back-to-school foam project, you won’t need to do anything that involves sewing. These no-sew pencil cases look adorable and can be decorated however you like!
What You Will Need:
- Two sheets of acoustic or colored craft foam, roughly 5″ x 7″ and 3″ x 7″
- Colored duct tape or duct tape with cute patterns
- Self-adhering Velcro tabs
- 1 hole-puncher
- Decorative ribbon
How to Make:
1. Line up your pieces of craft foam. The larger piece should be placed so it can fold over and form the closing flap. Secure the edges of the foam pencil case with duct tape and trim any excess.
2. Use a hole puncher to place four evenly spaced holes across the top flap to thread your decorative ribbon through. Secure your ribbon with a tiny bit of duct tape.
3. Attach the Velcro to the front flap and pencil case so it closes, and you’re done!
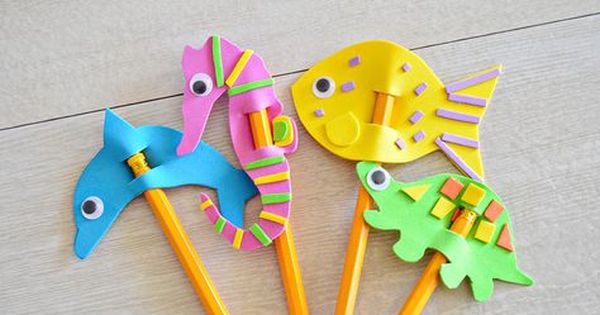
DIY Foam Animal Pencil Toppers
This one is a fun foam craft for parents to do with their kids–the more you make together, the more animals they’ll end up with! These easy foam animal pencil toppers make their favorite pencil or pen stand out. Not only are they cute, but they’re great for the tiny ones to learn and recognize animal shapes.
What You Will Need:
- Acoustic or colored craft foam
- Scissors or sharp crafting knife
- Printed out templates of animal shapes that you want to use
- Elmer’s glue
- Marker or pencil for tracing
How to Make:
1. Find a free animal outline template, print it on paper, and then cut out the template.
2. Choose any color craft foam for a fun base.
3. Place your paper template on a foam sheet, trace it with a marker or pencil, and cut out the foam animal shape.
4. Once the foam animal shape has been cut out, fold the animal foam shape in half and cut in the fold two small slits. The two slits will be the area that the pencil will slide into.
5. You can use a marker to draw details like eyes or add some fun stick-on googly eyes. You can also decorate with anything like sequins, glitter, or other foam shapes. Once you’ve decorated, congratulations, you’re done!
Leave a Reply